Orwell Astronomical Society (Ipswich)
CCD Imaging With A Schmidt Camera
Introduction
Back in 1985, I built a Schmidt camera [1] with the intention of imaging Halley's Comet on its return in 1986. I obtained some interesting results with star clusters, comets and galaxies. However, the difficulties associated with cutting, loading and subsequently processing in complete darkness individual disks of film were burdensome and, as a result, after a couple of years, I rarely used the camera. In the last few years, however, a few observers have started to use CCDs with Schmidt cameras with some stunning results [2] so I decided to resurrect the old instrument and bring it into the 21st Century. A potential major problem with this approach is that the focal surface of the Schmidt camera is curved (with a radius equal to the camera's focal length), and therefore appears to be incompatible with the flat chip of the CCD. So how can the two be used together?
I tried to contact some amateur observers using Schmidts with CCD's to ask how their systems worked, but with limited success! Gerald Rhemann refused to tell me anything about his system saying that he was preparing an article for Sky & Telescope and I would have to wait for it to appear. (That was in January 2005 and I have yet to see it in print.) I also tried to contact David Levy who mentioned a "heavily modified" CCD that he uses in a 30 cm F/2.2 Schmidt for comet and asteroid hunting [3]. Unfortunately he did not reply to my e-mails. He subsequently published another article in Sky & Telescope giving some limited technical background to his system [4]. However, before his second article appeared I had already searched for "CCD+Schmidt" on the Internet and found the Catalina Sky Survey pages. The Catalina investigators use a large CCD on a 69 cm aperture Schmidt for near Earth asteroid hunting. I emailed Steve Larson, principal investigator with the survey, and received a detailed reply within hours. Steve provided much of the information that I needed to proceed with my own project to convert my camera from film to CCD imaging.
There are two cases to consider:
- For a relatively long focal length and/or a small CCD chip, no field flattener is required.
- For a relatively short focal length and/or a large CCD chip, a field flattening lens is required to give satisfactory image quality across the full field of view.
1. No Field Flattener
For modest sized instruments, things couldn't be simpler. Just replace the film holder with the CCD camera head and away you go! Typically the CCD is so much smaller than the area covered by the film in the original camera that the field curvature has little impact on image quality. The Starlight Xpress MX916 camera I use has a chip size of 8.7x6.5 mm compared to the film diameter of 45 mm used in my original 16/22/40 cm Schmidt [5]. Of course the field covered is much reduced: 6° diameter using the curved film holder but only 1.25x0.93° for the CCD.
Being a coma free system, out-of-focus star images are still circular so slight focusing errors go unnoticed. In the case of my camera the field curvature over the diagonal of the CCD chip is just 36 microns. That is, the centre of the CCD chip can be 18 microns inside focus and the edge can be 18 microns outside focus. Ray tracing [6b] shows that the star images are still only 2 pixels wide everywhere on the CCD.
The pictures below show the inside of the 16 cm F/2.5 Schmidt in its original configuration, using discs of film, and after conversion with the CCD camera head mounted in place of the film holder on the modified three-vane spider. In each case the assembly fits into the bottom end of the tube holding the corrector plate. One of the big advantages of the Starlight Xpress CCD camera design is immediately evident: the camera head is only 65 mm in diameter so can fit unmodified into the Schmidt tube assembly - no need to rip out the CCD chip and mount the electronics separately.
 Original Schmidt camera: 22 cm mirror separated from the film holder by three invar rods.
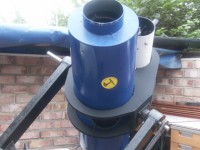
 Modified Schmidt camera: original film holder replaced by the CCD camera head.
 CCD chip inside the camera. Photo taken with a digital camera looking into the Schmidt.
2. Field Flattener
For large CCD's amd/or short focal lengths, field curvature blurs the images significantly at the edges of the flat field of the CCD. In this case a field flattening lens is required just in front of the CCD. I have yet to try this technique but will be incorporating it into my next project; a 32 cm aperture F/1.7 instrument. The field flattening lens is typically plano-convex with the convex side (facing the mirror) having a curvature, R, given by [6a]:
R = F(n-1)/n
where F is the focal length of the Schmidt camera, and n is the refractive index of the glass used for the field flattening lens. More generally, for any shape of field flattening lens, the focal length of the lens, flens, is given by [7]:
flens = F/n
where F and n are defined above. Note that the first equation above is a special case, for plano-convex lenses, of the second, general equation.
The Catalina Sky Survey Schmidt uses a bi-convex lens with a focal length the same as that for a plano-convex with radius R derived above [8]. This lens is used in place of the optical window which gives a hermetic seal to the camera head preventing condensation when the CCD chip is cooled. A bi-convex lens is chosen so that the curved inner surface of the lens (plus an anti-reflection coating) eliminates internal reflections which can cause ghost images on the CCD.
Note that the field flattening lens introduces some residual coma into the system [6a]. This can be partly offset by moving the corrector plate slightly towards the primary mirror. This remains to be accurately calculated for my new system but will be of the order 10-15 mm.
First Test Images
Back in 1930 when Bernhard Schmidt was testing his first camera, he photographed a distant tree at night to illustrate the power of his new invention. As I have a distant western horizon, with trees, I decided to repeat his test for my first image with the CCD. The result is shown below along with a daylight shot of the same tree in the distance. I used the image to enable focussing the system approximately to infinity before trying it on the night sky.
 The distant tree in daylight.
 CCD image, taken with the modified Schmidt, of the tree in deep twilight.
Focusing
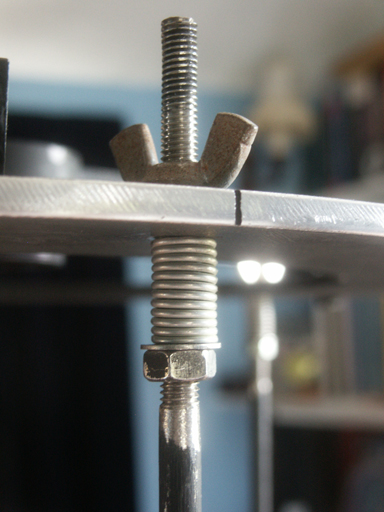
Apparently focussing can take years [9]! However, by careful design, it is possible to focus the camera in real time. The metal plate holding the spider for the CCD head is free to move in the telescope tube and is mounted on three compression springs each of which is adjustable with a wing-nut, see figure below for detail. The wing nuts are towards the corrector and can be accessed through holes in the metal plate on which the corrector lens is mounted. Three lengths of 6 mm metal rod, with suitably shaped ends, engage the wing-nuts and, by turning the rods while observing the images from the CCD (set to "continuous" mode) on the computer monitor, the position of the CCD can be adjusted to achieve focus. Once focusing is complete the rods can be removed and the access holes blanked off. Clearly the orientation of the image on the screen with respect to the three points used to adjust focus must be known. This is easily worked out in advance of the focusing operation by observing a distant object during daytime.
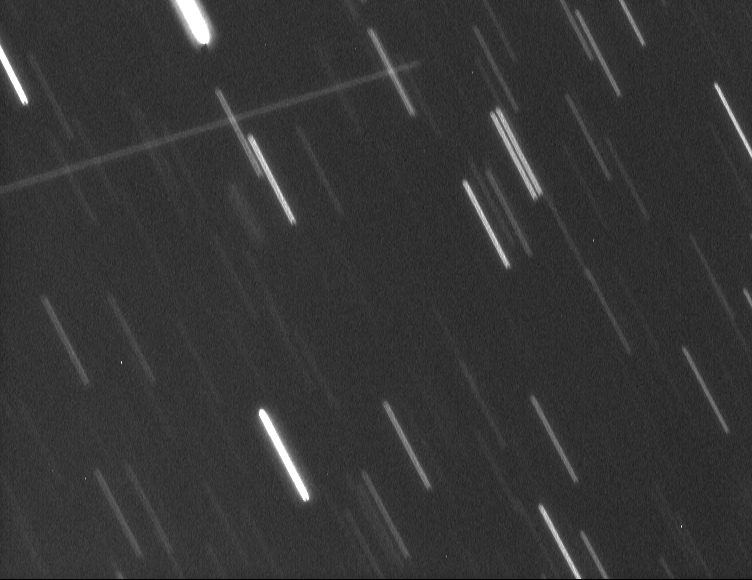
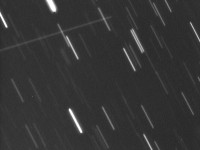
Star trails are always a good place to start in astronomical imaging and this case is no exception. The first star trail images showed the potential of the system... and the fact that focusing still had to be perfected! After focusing, star trails were just 3 pixels wide. Note that star trails are a uniform width towards the edge of the frame indicating that field curvature isn't a significant problem for focus over the field of view. Focusing took less than one hour!
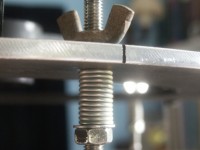 Detail of focusing mechanism.
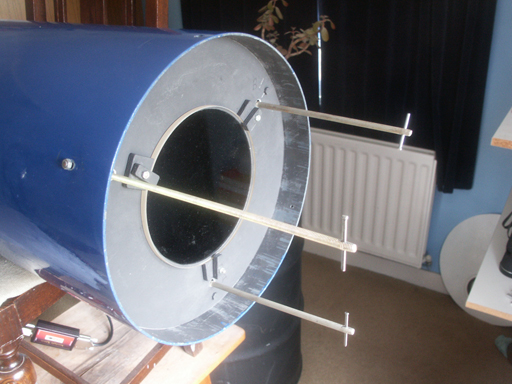
 Temporary focusing rods in place. Approximate infinity focus is achieved by observing a distant terrestrial object.
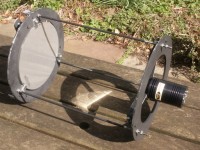
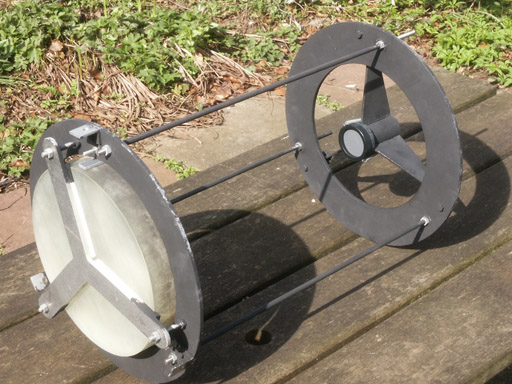
 The Schmidt camera ready for use.
 Star trails before focusing.
 Star trails after focusing.
Astronomical Images
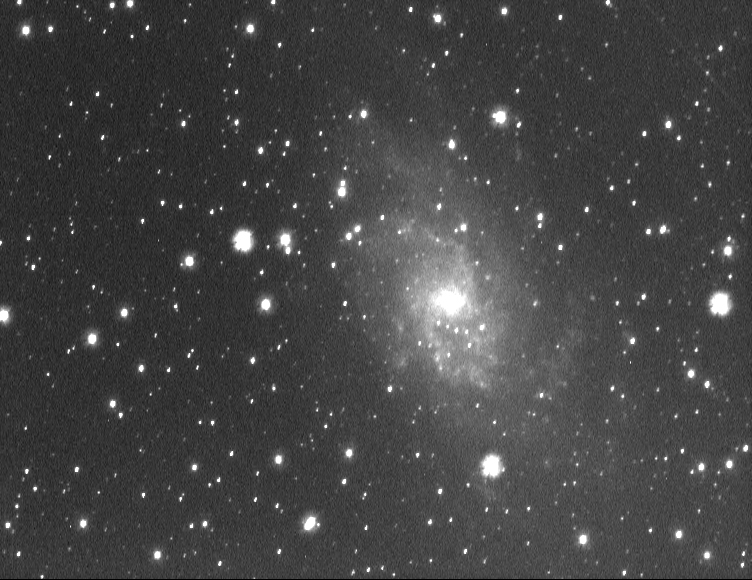
The first four images below are a selection of CCD images of well-know galaxies and nebulae taken on the first night operating with the new system. All images are the results of 30 second integrations, have had the dark field image subtracted and have been contrast stretched. Limiting magnitude is 15 in the originals.
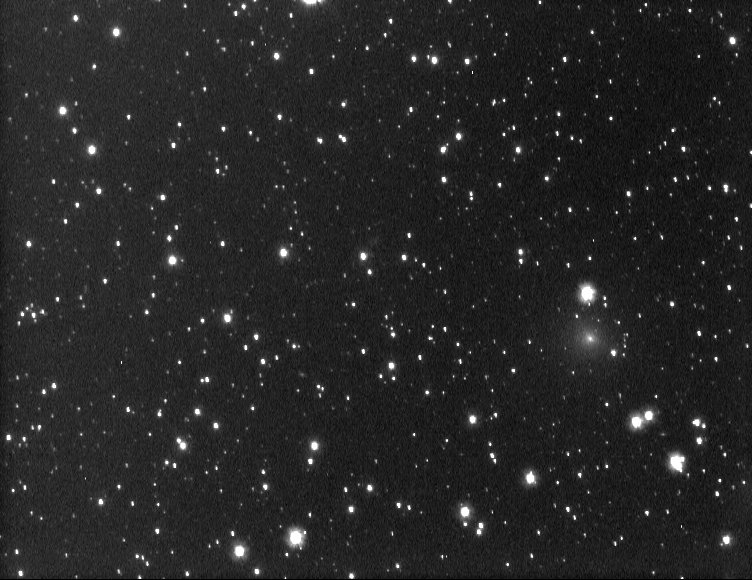
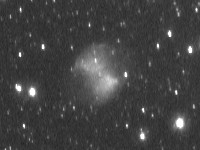
The fifth image below is the first "useful" image from the new camera. It shows Comet Barnard (177P), taken on 29 August 2006, using a two minute exposure. I could not see the comet visually, however the image shows the comet well as a point-like nucleus surrounded by a very diffuse coma. Also lurking in the background of the image are two faint UGC galaxies: one magnitude 15.4, the other magnitude 15.8. (On the date in question, the comet was tracking through Draco, fading slowly, but was expected to be visible for several weeks.)
 Pinwheel Galaxy, M33.
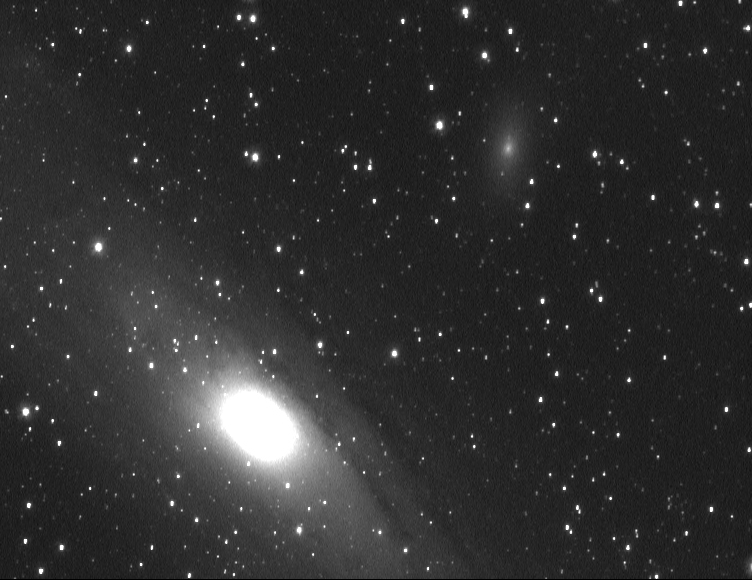
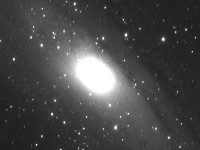 Andromeda Galaxy, M31, and M110.
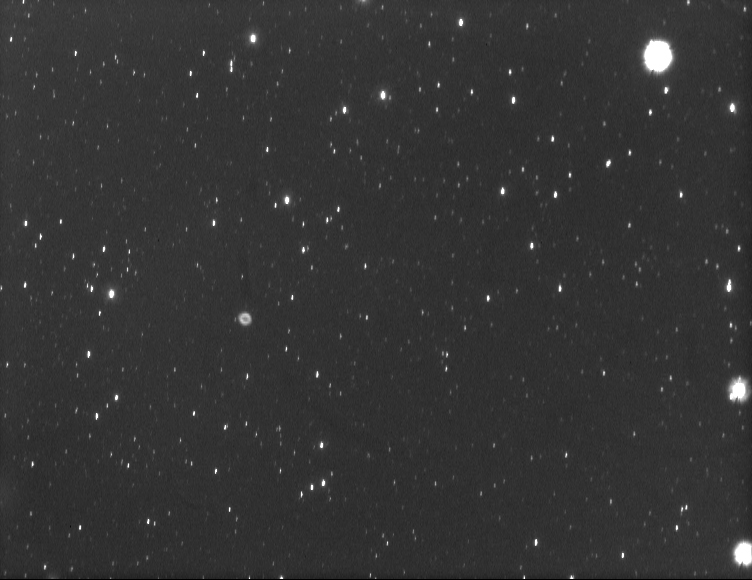
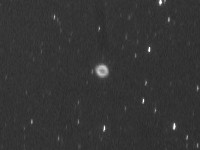 Ring Nebula, M57 and Β Lyrae.
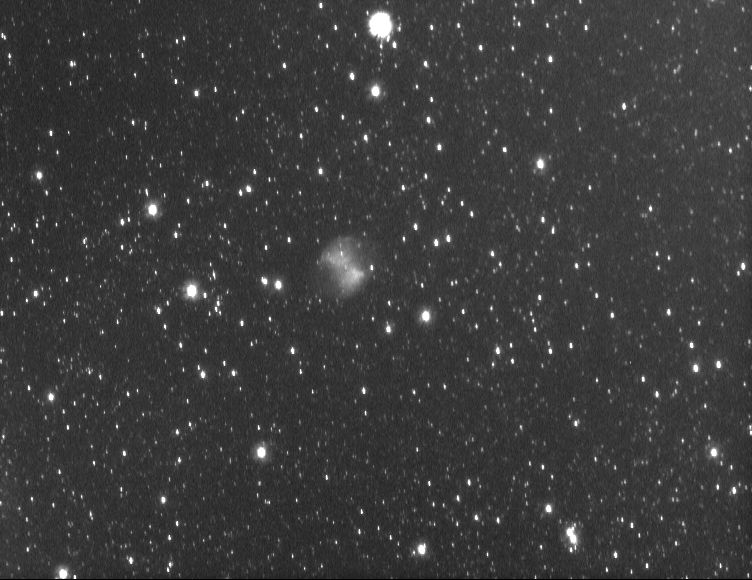
 Dumb-bell Nebula, M27.
 Comet Barnard.
Some further developments are clearly needed to improve on these first results:
- Refine the polar alignment of the mount (see below).
- Small adjustment required to improve focus.
- Investigate large flare around images of bright stars.
- And in the longer term add a field flattening lens for the ultimate performance.
Polar Alignment
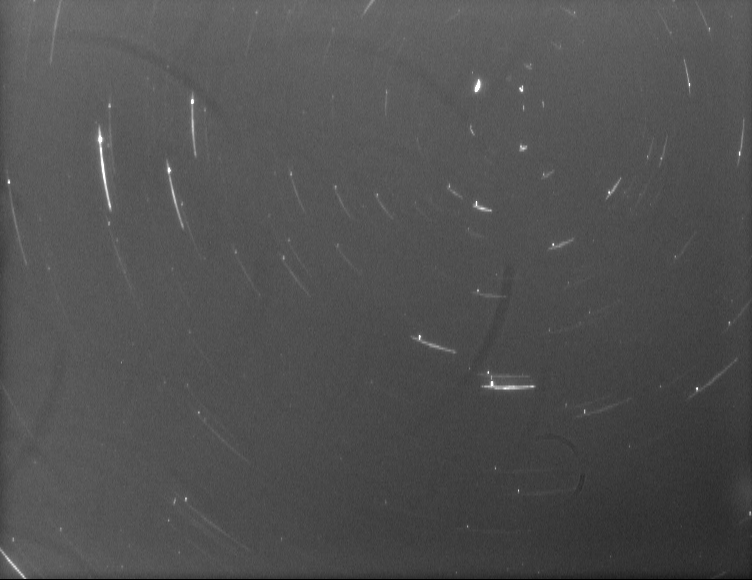
Polar alignment can be as tedious as focusing! But again, with the ability to image the sky in real time, this too can be made easier and much quicker. The following procedure achieves rapid polar alignment:
- Point the camera to the celestial pole and take an image.
- Identify the position of the pole from a star chart.
- Take another image but this time disengage the drive and rotate the mount during the exposure. (See image below.)
- The stars will appear as arcs centred on the rotation axis of the mount.
- Identify the position of this rotation axis and compare with the true celestial pole.
- Adjust the mount to bring the two together.
- Repeat steps 3 to 6 to achieve the required accuracy of alignment.
- Job done!
This technique is used at professional observatories not only to check polar alignment but also to quantify flexure of the telescope as it rotates. If the telescope flexes, star trails become ellipses rather than circles [10].
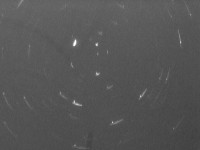 Image taken during step 3 of polar alignment. It shows the polar axis to be OK in altitude but off by just over 2° in azimuth!
Update, 26 August 2006
Since the above was written, a commercial system, a 200 mm F/2.5 Schmidt, has become available from Opticstar Ltd. This is a new product from the company and was advertised for the first time in the September 2006 Astronomy Now.
Update, 2009
I installed a bigger CCD (a Starlight Xpress SXVF-H16 CCD) into the Schmidt camera to give over four times the field of view of the old model. The field of view is now square and just over 2° on each side. To show what it is capable of, I pointed it at M81 and M82 on the night of 20 March 2009 to make the first test images; the results are below. The full field of view image below is one quarter of its original size and the views of the individual galaxies are full scale (0.5° fields of view). Although these first images are encouraging, there are still some artefacts to iron out. Towards the edges and corners of the images, stars appear decidedly disc-like as a result of the mismatch between the curved focal surface and the flat CCD chip. I therefore completed the upgrade, in mid-May 2009, by removing the original planar optical window of the CCD and replacing it with a plano-convex field flattening lens (268 mm focal length) to compensate for the curvature of the focal surface [11]. The lens is, in fact, the smallest piece of optics I’ve ever made.
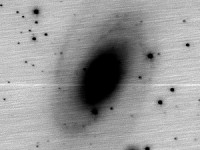
On 19 May 2009 there were enough hours of darkness to take the first images with the new system. A slice of one of the images, showing M101, is below. It was assembled from 46x30 second exposures combined using IRIS software and post processed in Photoshop. The slice runs from corner to corner and illustrates the nicely focussed star images across a span of 3°.
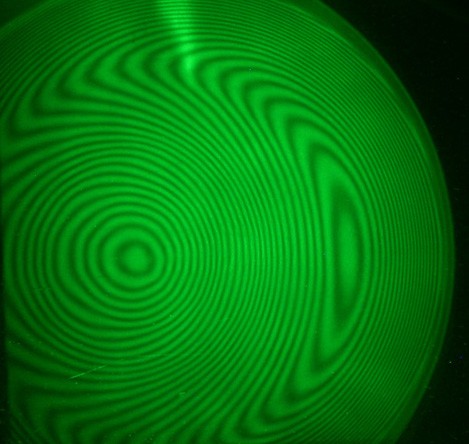
Also shown below are images of the field flattening lens and of the profile of the 150 mm Schmidt corrector plate. To obtain the latter, I placed the corrector on an optical flat and illuminated it with a monochromatic green laser at 532 nm. There is a slight wedge between the two pieces of glass so the pattern isn’t symmetric. The image can be read as a contour map of the shape of the corrector. It shows the convex central region, a neutral zone at about 70% of the radius and then the upward curving outer zone.
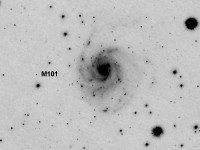
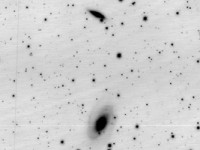 M81 and M82, 20 March 2009
 Close-up of M81.
 Close-up of M82.
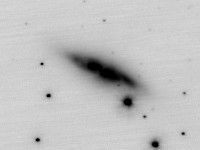
 M101, 19 May 2009 from 23:40 to 23:59 UT.
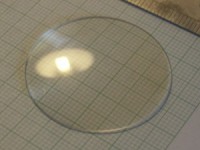 Field flattening lens.
 Profile of the Schmidt corrector plate.
References And Notes
See the many images by Jager and Rhemann in the comets section of
The Astronomer web site. The comet Machholz images from early 2005 are particularly impressive. See also the website of the comet section of the German Astronomical Club, Vereinigung der Sternfreunde, fg-kometen.vdsastro.de.
David Levy, Sky & Telescope, March 2006, pages 91-92.
David Levy, Sky & Telescope, July 2006, pages 106-107.
Schmidt camera dimensions are often given in this shorthand, e.g. 16/22/40 cm where 16 is the corrector plate aperture, 22 the mirror diameter and 40 the focal length.
H Rutten and M van Venrooij, Telescope Optics, page 77, Willmann-Bell 1988.
Software supplied with book [6a].
Dr Richard Buchroeder, Optical Design Service, Tucson, Arizona, private e-mail communication.
Dr Steve Larson, Lunar and Planetary Lab, University of Arizona, private e-mail communication.
David Levy, Sky & Telescope, November 2003, pages 79-81.
S Marx and W Pfau, Astrophotography with the Schmidt Telescope, Cambridge University Press, 1992, pages 146-147.
My thanks go to Neil Morley for supplying the heat sink compound I needed to re-assemble the CCD camera.
Mike Harlow
 Original Schmidt camera: 22 cm mirror separated from the film holder by three invar rods.
 Modified Schmidt camera: original film holder replaced by the CCD camera head.
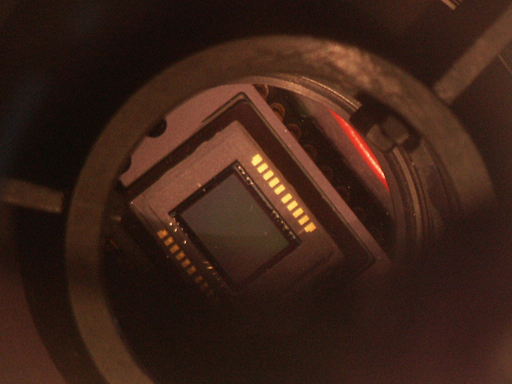 CCD chip inside the camera. Photo taken with a digital camera looking into the Schmidt.